Audacity guide
audio editing, recording from Line in inputs, Mic inputs, CD digital, AUX inputs, OS sounds from other audio playback software, players etc. Using Audacity you can convert WAV to MP3, WAV to OGG, MP2 to MP3, MP2 to WAV, MP2 to OGG, MPA to MP3, MPA to WAV, MPA to OGG, MP3 to WAV, MP3 to OGG, M2A to MP3, M2A to WAV, M2A to OGG, AIFF to WAV, AIFF to MP3, AIFF to OGG, OGG to WAV, OGG to MP3, AU to WAV, AU to MP3, AU to OGG. All formats for importing (WAV, MP2, MP3, MPA, M2A, OGG, AIFF, AU) could be edited using all internal effects (or filters, if you have some experience with audio editing software). These effects are:
amplify, bass boost, change pitch, change speed, change tempo, click and pop removal, dynamic range compressor, echo, equalization, fade in, fade out, fft filter, invert, noise removal, normalize, nyquist prompt filter, phaser, repeat, reverse, wahwah, cross fade in, cross fade out, delay, gverb, hard limiter, high pass filter, low pass filter, sc4 filter, tremolo filter.
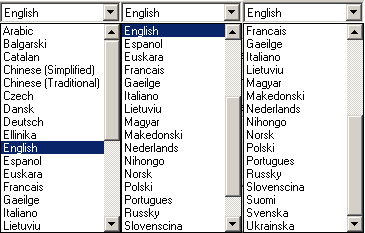
Audacity is the free software and supports these languages: Arabic, Bulgarian, Catalan, Chinese (Traditional), Chinese (Simplified), Czech, Danish, German, English, Spanish, French, Italian, Lithuanian, Hungarian, Macedonian, Dutch, Norwegian, Russian, Slovenian, Finnish, Swedish, Ukrainian. It is very comfortable to use Audacity on your own language, but this guide will show English items.
Audacity download
Here it is a main guide menu, we recommend to you start learning here - Audacity installation
Audacity languages selection during installation
Audacity main window
Edit audacity preferences
- Audio in/out
- Quality - Default sample rate
- Quality - Default sample format
- Quality - Real time sample rate converter
- Quality - High quality sample rate converter
- Quality - Real time dither
- Quality - High quality dither
- File formats - How to work with uncompressed files
- File formats - Uncompressed export format
- File formats - Uncompressed export format other
- File formats - OGG export setup
- File formats - MP3 export setup
- File formats - MP3 export setup lame_enc_dll browse
- File formats - MP3 export setup - Lame version and default bitrate
- Spectrograms
- Directories
- Interface
- Keyboard
- Keyboard combination for export as mp3
- Keyboard combination for export as mp3 result
- Mouse
Audacity control toolbar
Audacity edit toolbar
Audacity mixer toolbar
Audacity meter toolbar
Open file
Supporting file types
Open file waveform
Vertical zoom for waveform
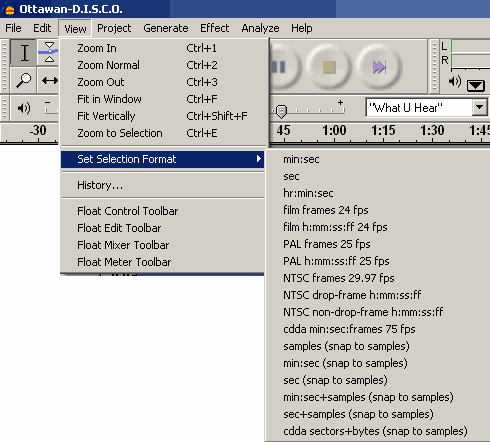
Main view commands selection format
Hand cursor to the right
Hand cursor to the left
Start selection point
End selection point
Correct end selection point
Select all file
Audacity skip to start button
Audacity play button
Audacity loop play button
Audacity record button
Audacity pause button
Audacity stop button
Audacity skip to end button
Track menu listing
- Stereo track
- Stereo track split
- Stereo track after splitting
Make stereo track after editing
Edit menu listing
- Select submenu
- Move Cursor submenu
- Snap to submenu
View menu listing
- History undo level 1
- History undo level 2
- History undo level 3
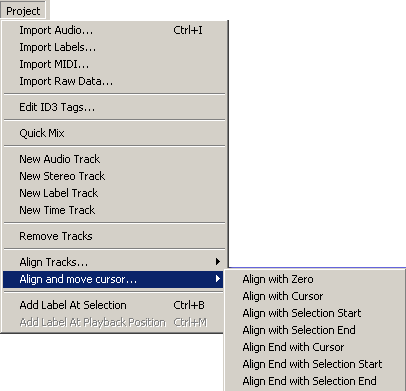
Project menu listing
- Edit ID3 Tags
- Quick Mix
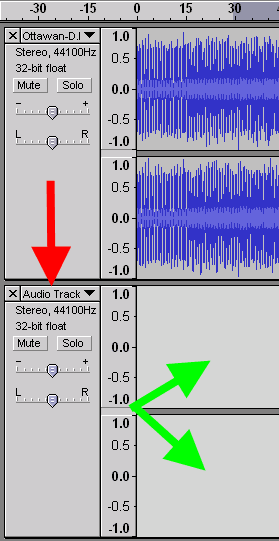
- Adding a new mono audio track
- Adding a new stereo track
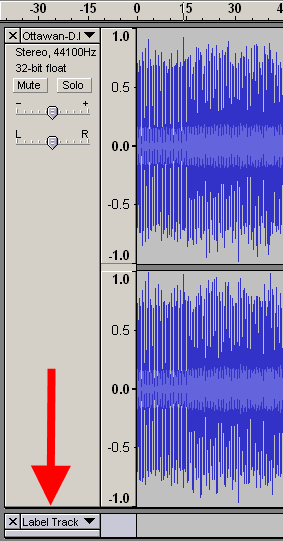
- Adding a new label track
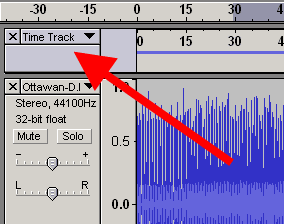
- Adding a new time track
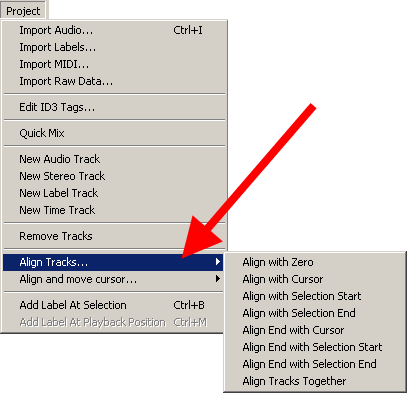
- Align Tracks submenu
- Align and Move Cursor submenu
- Adding a new label at selection
- Adding a new label at playback position
- Indicating of the added labels
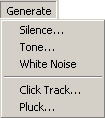
Generate menu listing
- Silence
- Silence resulting window
- Tone Generator
- Tone Generator Result for Sine Wave 440 Hz
- Tone Generator Result zoom view Sine Wave 440 Hz
- White Noise
- White Noise Result Waveform
- Click Track for New Track
- Resulting Window for the Click Track
- Pluck
- Pluck Result for 60 Midi Note Number
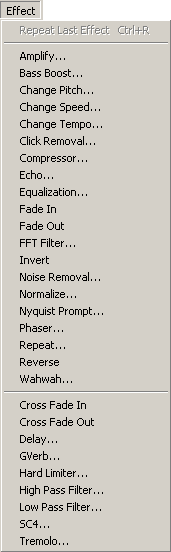
Effect menu listing
- Amplify
- Bass Boost
- Change Pitch
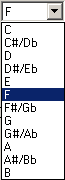
- Change Pitch range
- Change Speed
- Change Tempo
- Click and Pop Removal
- Compressor
- Echo
- Equalization default window
- Equalization - Load Predefined Curve
- Equalization - Load Predefined Curve EMI 78 loaded result
- Equalization - User edited curve at resized window
- Fade In
- Fade In resulting Waveform
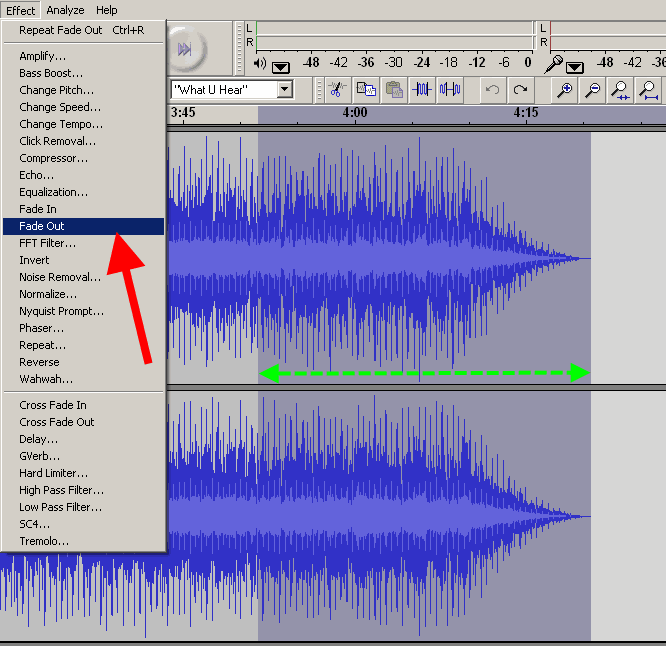
- Fade Out
- Fade Out resulting Waveform
- FFT filter - Default window
- FFT filter - User edited curve
- Invert
- Noise removal
- Normalize
- Nyquist Prompt
- Phaser
- Repeat
- Reverse
- Wahwah
- Cross Fade In
- Cross Fade Out
- Delay
- GVerb
- Hard Limiter
- High Pass Filter
- Low Pass Filter
- SC4
- Low Tremolo
Analyze menu listing
- Spectrum analyze
- Beat finder
- Beat finder result
- Silence finder
- Silence finder result
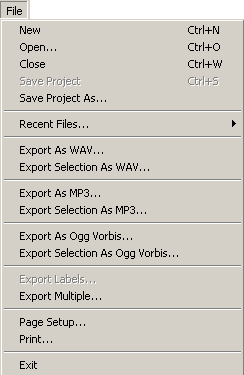
File menu listing
NTSC Film 23.976 FPS To PAL 25 FPS
PAL 25 FPS To NTSC Film 23.976 FPS
During an installation of "audacity-win-*.*.*.exe" setup file Audacity will ask the language you prefer to use. We recommend to select from the listing "English" language to make exactly understandable our guide and using in it items, terms, links, actions etc. Later, from "Preferences" menu, you can change language to your own at any moment.
Top
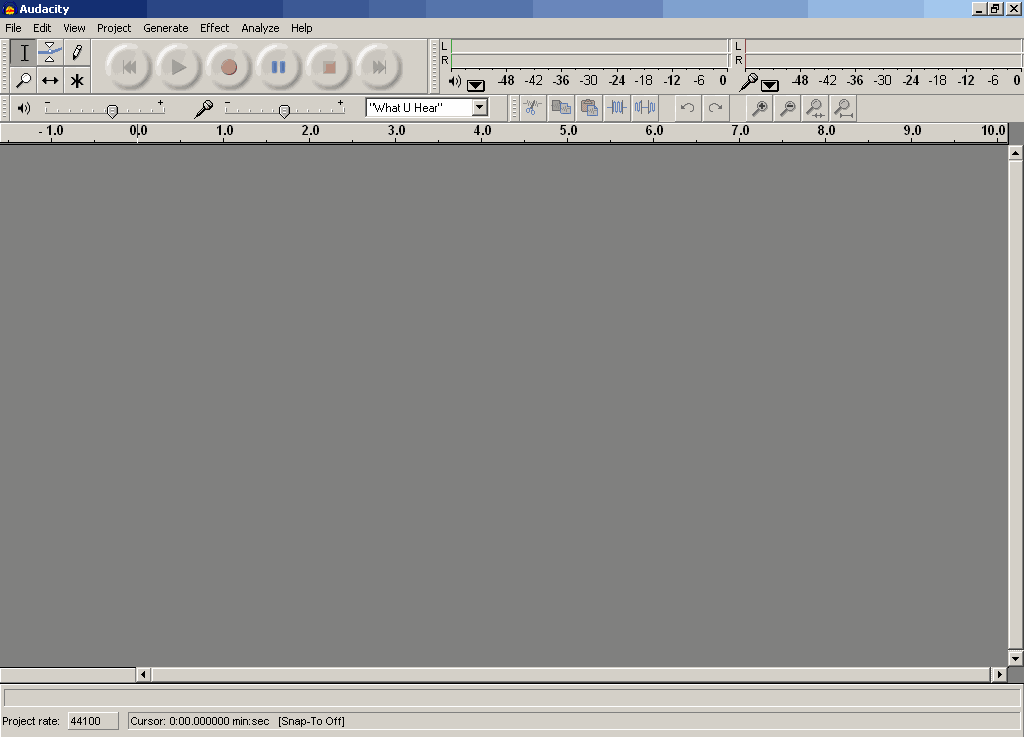
After the launching of the Audacity we will see main program window. This contains main menu with File, Edit, Project, Generate, Effect, Analyze, Help items, toolbars for base editing functions, audio timeline, blank space for edited audio tracks. It is recommended to use values depicted on the screenshots in this guide.
Top
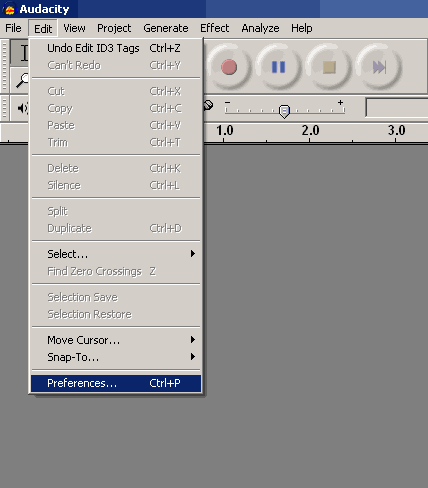
Before a starting of using of Audacity, firstly we need to edit Audacity preferences. To view preferences window, please select "Preferences" from "Edit" menu, or simply press "CTRL+P" key combination. In most cases preferences editing have to be done once for the all next times using.
Top
Audio I/O tab. On this tab select "Playback" device - Wave mapper, or sound card name if your PC have more than one sound card, and you definitely know from what you are waiting for the sound, i.e. you connected your monitors, headphones to them.
For "Recording" device select "Wave mapper" or sound card name from the listing - in this case don't forget to connect (plug) audio sources to audio inputs of the selected sound card. If you are not planning to record audio, there are will not be any kind of cables plugging, etc. Select more than "2 channels (Stereo)" if you are planning to record from multi-channel source. By default "2 channels (Stereo)" is OK.
"Play other tracks while recording new one" and "Software Playthrough (Play new track while recording it)" are unchecked options and there are better to use them for advanced users.

Top
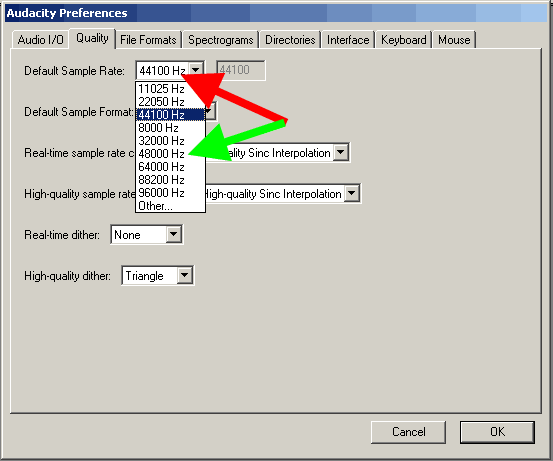
Quality tab. Audacity supports these default sample rates, select from the list: 8000 Hz, 11025 Hz, 22050 Hz, 32000 Hz (Digital radio broadcasting purpose in some cases), 44100 Hz (standard for Audio CD recording) - red arrow, 48000 Hz (standard sample rate for DVD Audio) - green arrow, 64000 Hz, 88200 Hz (doubled CD sample rate), 96000 Hz (doubled DVD sample rate), Other (Any sample rate you desire, option for the advanced users). For base editing purpose select the target sample rate and work with it - i.e. 44100 Hz for Audio CD, 48000 Hz for DVD, result will be good. If you plan to record multi channel project and you have professional sound card, working with 96 kHz, 24 bit audio format, use these values, result will be better, don't to resample your project to the desired sample rate (DVD, Audio CD, etc.). If you plan to work with increased sample rates in your projects, use the values calculated by multiplying the target sample rate to 2,4 - 96 KHz for DVD, 88,2 kHz for CD. Remember, the project size on your hard drive will grow also. And finally, doubled sample rates will work correctly, if your sound card built on a ADC/DAC (Analog-To-Digital, Digital-To-Analog) converter with the same sample rates. Consumer sound cards work with 44,1 and 48 KHz and lower frequencies, sound cards with 96 KHz chip on the board will cost to you more than $300, so you decide.
Top
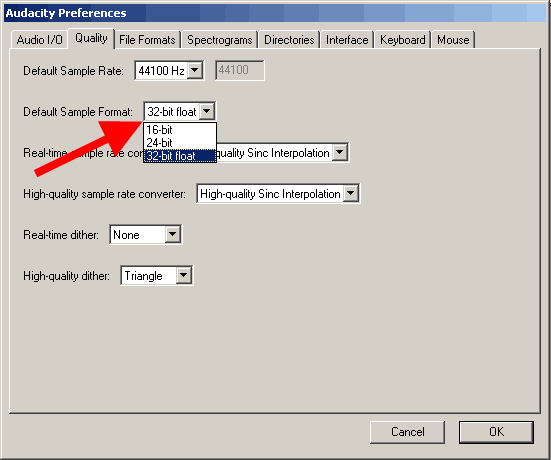
Quality default sample format. By default Audacity use 32-bit sample format. If you don't need such precision, select 24 bit or 16 bit. It will decrease the project size on your hard drive. For consumer sound cards you can use 16-bit sample format, if you have 24-bit sound card, change to it, but don't forget to check wave mapper or direct sound preferences in your Windows OS reading sound card manual - this option for the advanced users. Therefore, we use 32-bit sample format by default in our guide.
Top
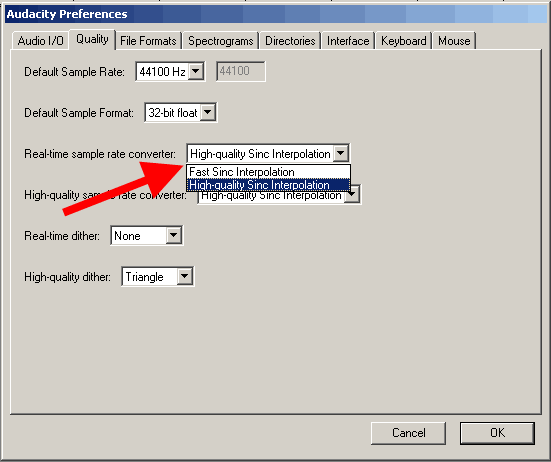
Real time sample rate converter. If you have modern processor in your PC, it is to set "High quality Sinc interpolation" for the best results.
Top
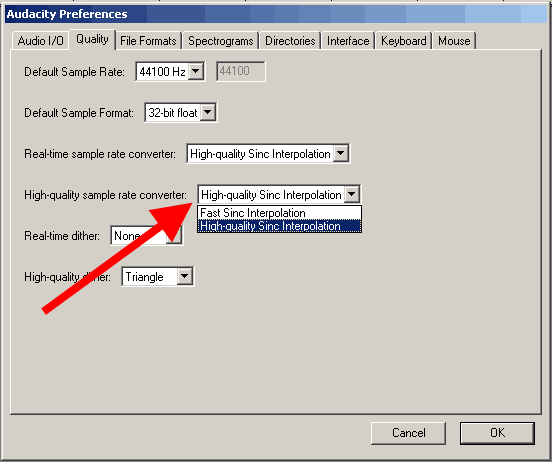
High quality sample rate converter. Set this value to the "High quality Sinc interpolation" even you have not modern processor - this option will help to get best results when you will save your project to the target sample rate.
Top
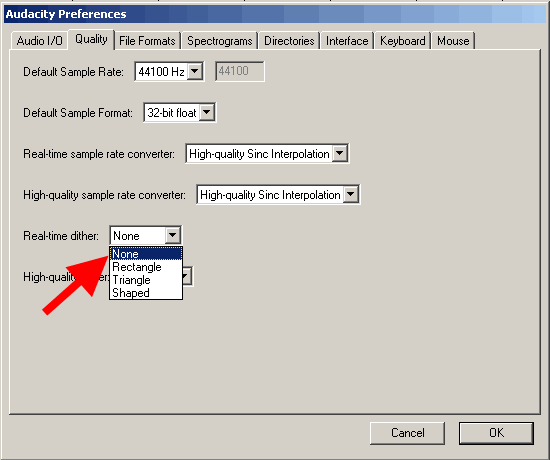
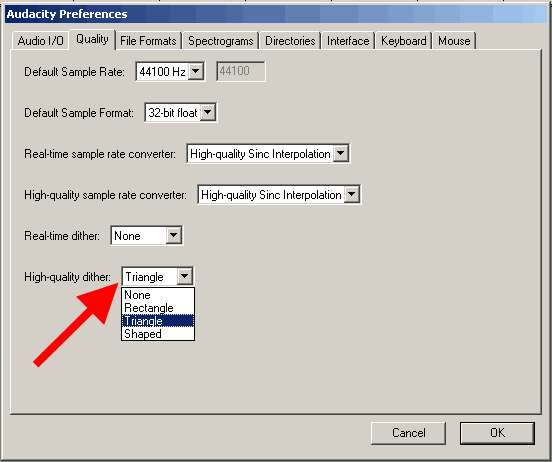
Real-time dither. We don't use real-time dither - select "None"
Top
High-quality dither - for the best accuracy we select "Triangle" option
Top
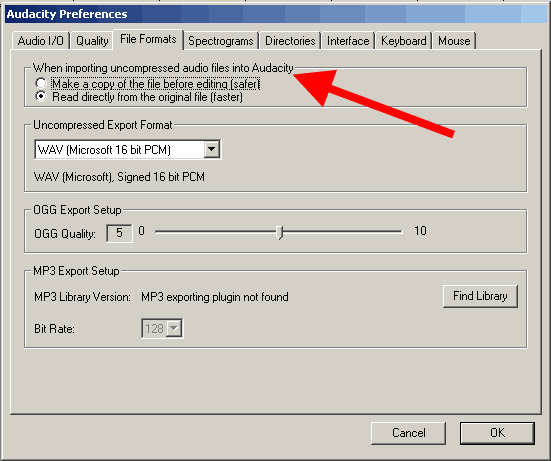
File formats tab. To work with uncompressed files faster check "Read directly from the original file (faster)". Another option - "Make a copy of the file before editing (safer)" will allow to you do not work with source file, saving it from the any editing.
Top
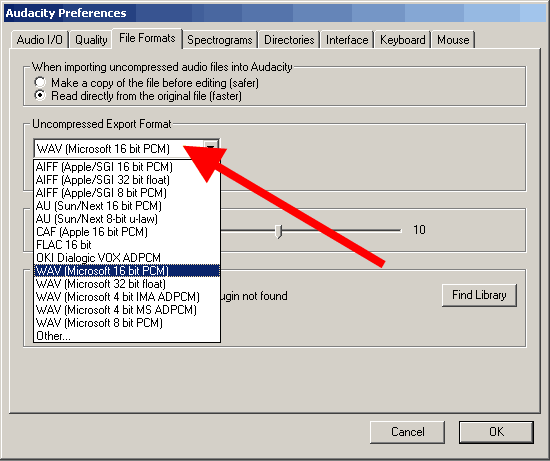
Uncompressed export format defines the format for the exporting Audacity project after editing - "WAV (Microsoft 16 bit PCM)" is ok in most cases.
Top
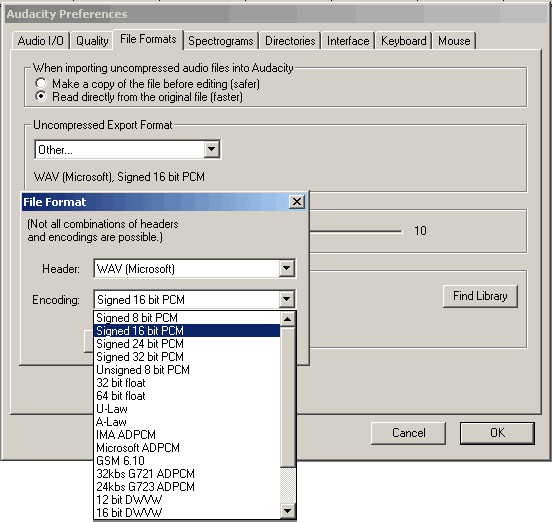
Other uncompressed export format could be used by the advanced user - changing a header, sample format. Using "Other" mode you can select 24 bit sample format for the exporting.
Top
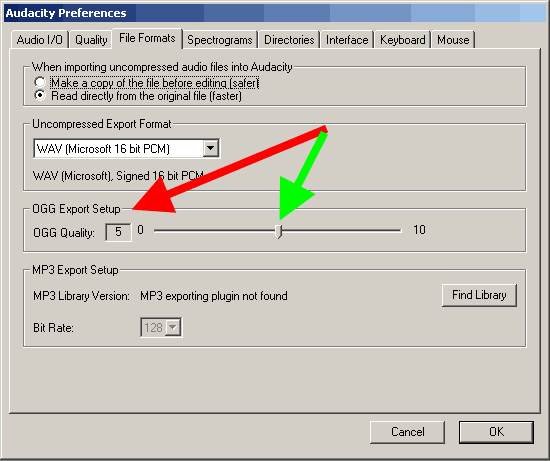
OGG export setup. If you plan to export your projects as OGG Audio files, adjust this option following this values: 0 will set 64 kbit bitrate, 5 (default)) will set 160 kbit and 10 will set 500 kbit for OGG exporting. Remember, that OGG audio compression is more optimal than MP3 compression, and you can get good results at low bitrates.
Top
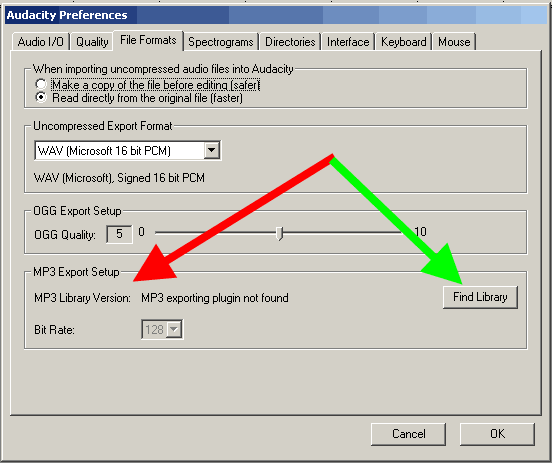
MP3 export setup. For mp3 exporting you will need free Lame Encoder library - "lame_enc.dll". Audacity installation package do not include this DLL file, so you can download it here - Lame Encoder v. 3.97 download - lame_enc.dll library. After the downloading end extracting from the ZIP archive, press "Find library" button, select a path to the "lame_enc.dll" on your hard drive - green arrow.
Top
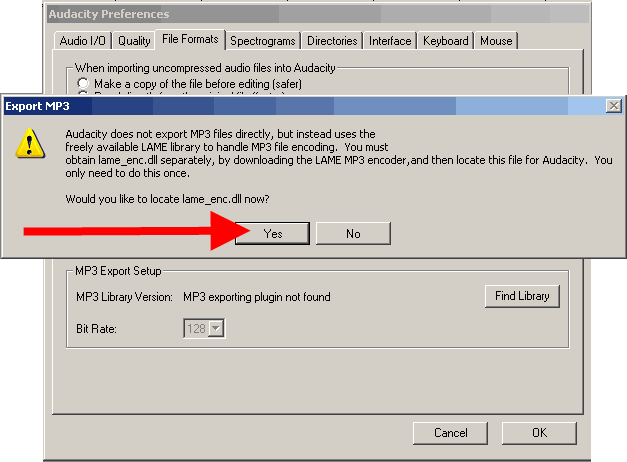
MP3 export setup - lame_enc.dll browse - for the question "Would you like to locate lame_enc.dll now" press "Yes"
Top
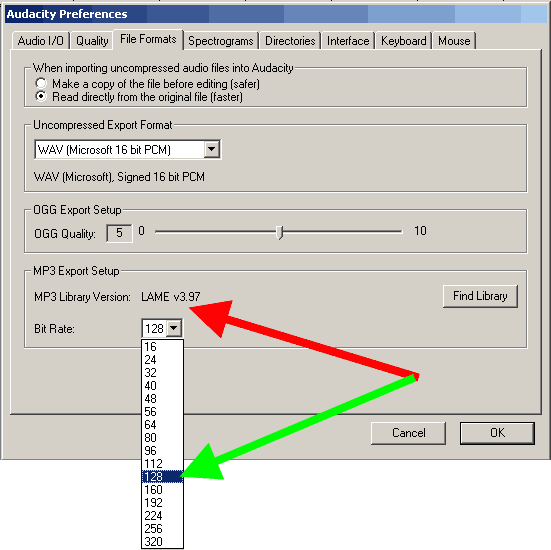
MP3 export setup lame version - Default bitrate. After that lame _enc.dll was plugged to the Audacity with v3.97 (red arrow), select the default bitrate for the MP3 exporting from the listing - green arrow
Top
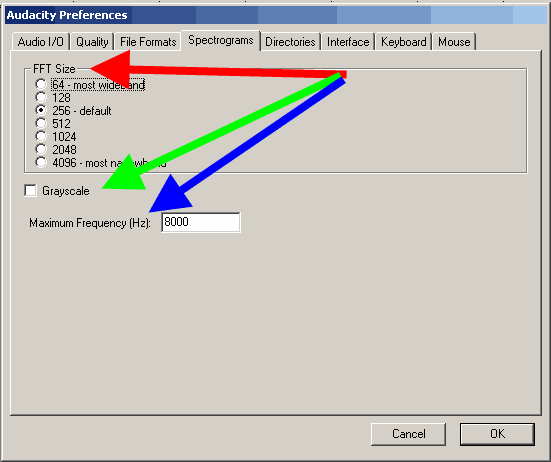
Spectrograms tab. Check the default value "256" - red arrow, if you need grayscale color using, check "Grayscale" - green arrow, and select the maximum frequency to draw in spectrograms (blue arrow). By default this frequency is 8000 Hz, don't worry it is the limit for the spectrograms drawing, for the full frequency range sample rate exists - sample rate must be divide to the 2. For example, for 44100 Hz the frequency range is 0-22050 Hz, it is the rule from the discrete mathematics.
Top
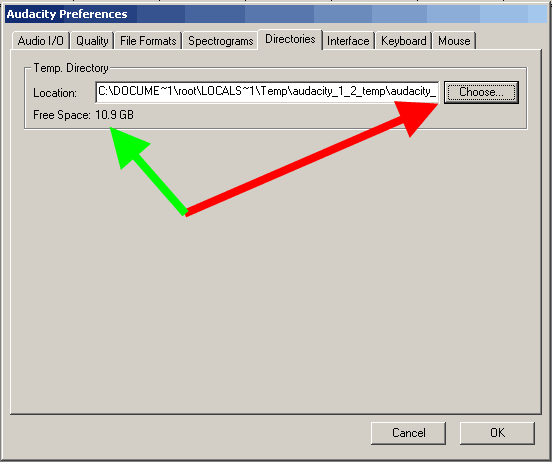
Directories tab. Select the path for the temporary Audacity files (red arrow) with enough space on it. Free space on the disk will be shown at the "Free Space" section
Top
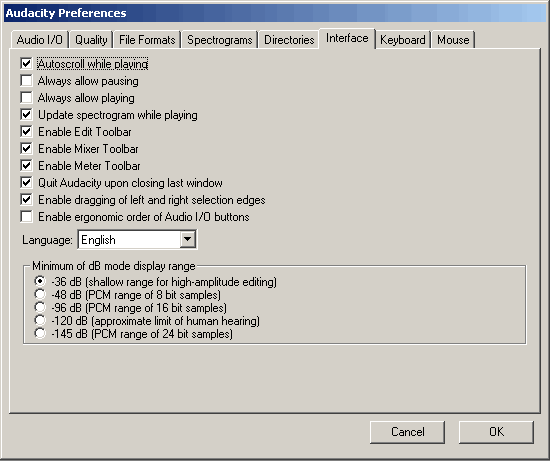
Interface tab. On this tab user can change Audacity interface settings. The default settings depicted on screenshot is ok here you can change the language of Audacity interface to your native, if you desire. "Minimum of dB mode display range" could select the accuracy of spectrograms drawing on your screen - it could be useful for 24-bit editing, for example.
Top
Keyboard tab. On this tab we can adjust keyboard combinations for frequently used operations in Audacity.
Top
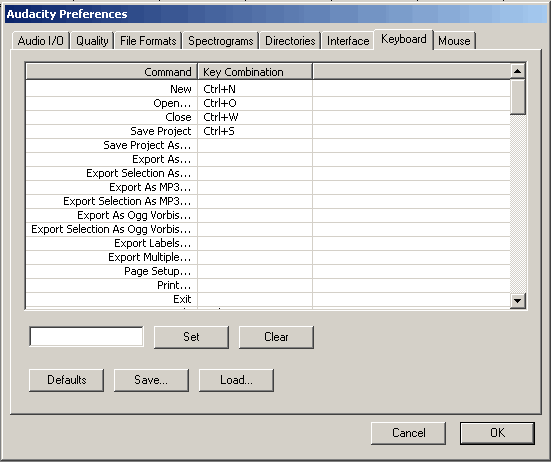
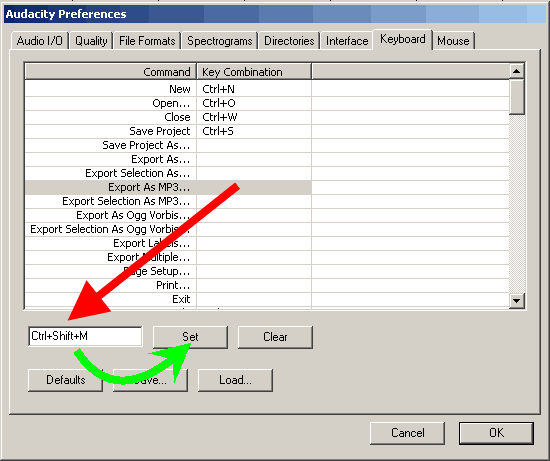
Let show an example for the keyboard combination adjusting for "Export as MP3". Select the desired string - then press "CTRL+SHIFT+M" keyboard combination (red arrow). After that press "Set" button to add your combination to the preferences listing
Top
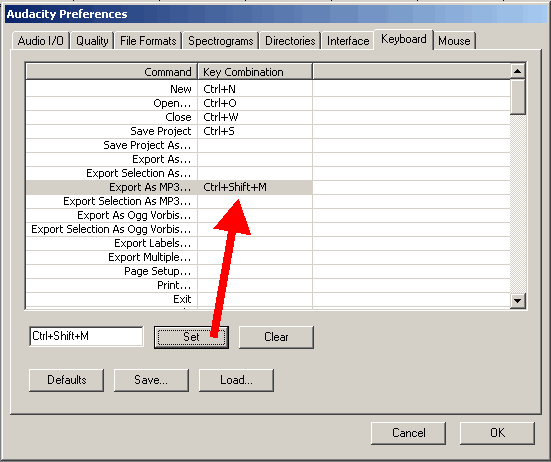
Result of our example for the keyboard combination adjusting shown in the listing.
Top
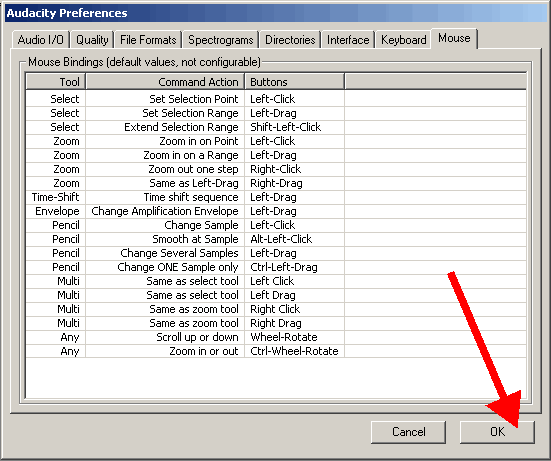
Mouse tab shows to the user mouse actions in Audacity. It is the last preferences tab, so we can press "OK".
Top
Audacity control toolbar contains buttons:
"Selection Tool" - this tool is for the waveform selection using mouse and "Shift+Left", "Shift+Right", "Shift+Home", "Shift+End" keyboard combinations. Holding "Shift+Left" or "Shift+Right" will select the range of waveform depending of the Selection format you have choose. "Shift+Home" will select the waveform from the cursor to the start position of the audio track. "Shift+End" selects the waveform from the cursor to the end of the audio track. To edit selection you can also use Audacity Hand cursors. To use this tool press "F1" key.
"Envelope Tool" will help to you to change the volume of the waveform parts using mouse on selected points. To use this tool press "F2" key.
"Draw Tool" helps to you to change the individual samples of the waveform - for the advanced users. To use this tool press "F3" key.
"Zoom Tool" helps to the user change waveform zooming, using left (Zoom In) and right (Zoom Out) clicks of your mouse, or holding "Shift" key using left mouse for "Zoom Out".. To use this tool press "F4" key.
"Time Shift Tool" moves your waveform to the right or to the left providing time-shifting for the audio track.. To use this tool press "F5" key.
"Multi-Tool Mode" combines the tools described above in one - need some experience with Audacity, could be used later.. To use this tool press "F6" key.

Top
Audacity edit toolbar contains these features:
Cut, Copy, Paste as the based editing options in Audacity editor.
Trim outside the selection will remove the audio to the left and right sides from the selection.
Silence will make the silence during selection of the waveform.
Undo and Redo buttons are for undoing or Redoing the Audacity operation.
Zoom in and Zoom Out for you if you prefer toolbars instead of mouse operations
Fit selection in window button will scale the selection to Audacity window's width.
Fit project in window will scale the full project to the window's width.

Top
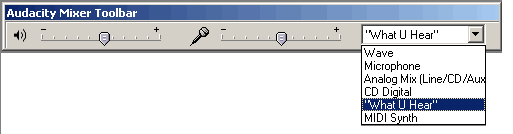
Audacity mixer toolbar contains these features:
volume for output and input device, and the name of the device
Top
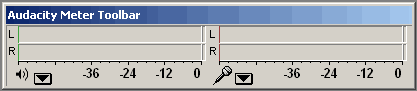
Audacity meter toolbar includes:
left meter part for the playback, and the right for the recording, including selecting for the monitor input. Any of the could be changed to the "Vertical stereo", or to the "Linear" scale, but the "dB" mode will work more closer to real sound equipment.
Top
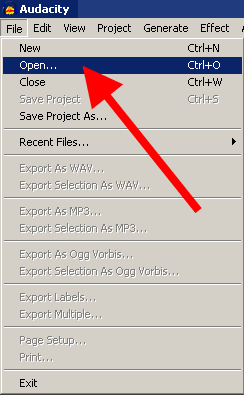
To describe all base features of the Audacity editor, we need to open file from hard drive. Select "File menu" click "Open" for the browsing of a media file.
Top
Audacity supports these file types: WAV, MP2, MP3, MPA, M2A, OGG, AIFF, AU, so you can select any file with these extensions.

Top
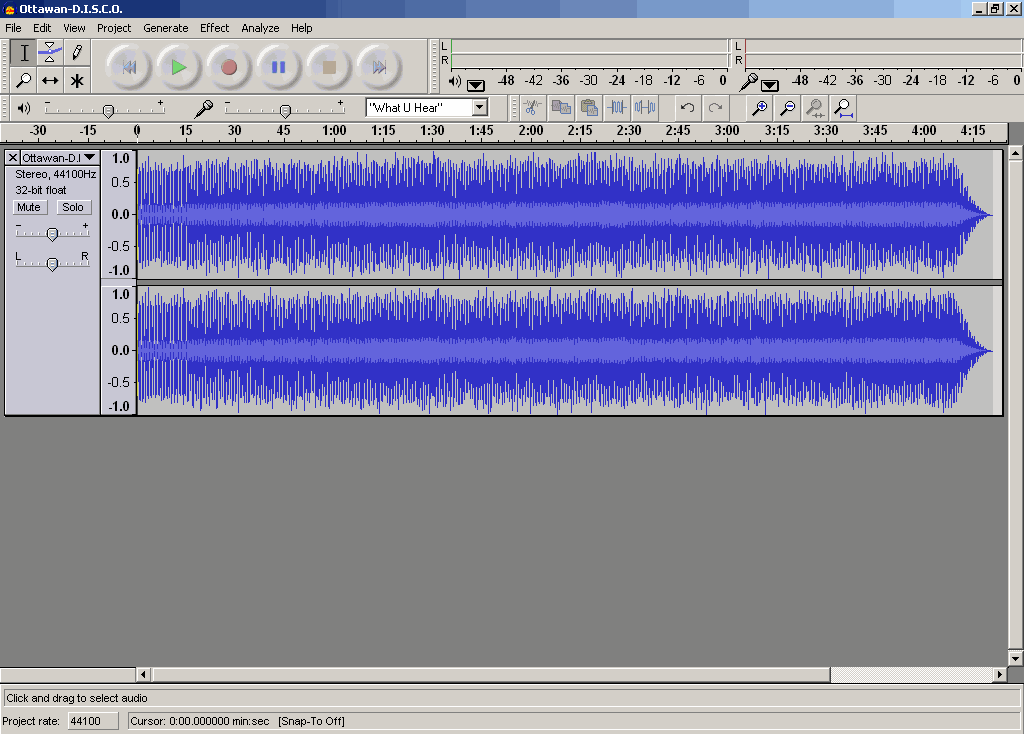
After the opening user could see audio file waveform.
Top
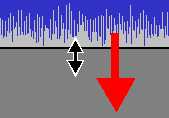
If you work with two channel (stereo) audio file, you may apply Vertical zoom for waveform. Move the mouse cursor to the bottom black line of the waveform, press left mouse button and holding it resize the vertical scale of the waveform.
Top
Audacity gives to user various selection formats - "min:sec" is ok, other selection formats are for the advanced users, who need to select sample depending of video format, Audio CD frames etc.
Top
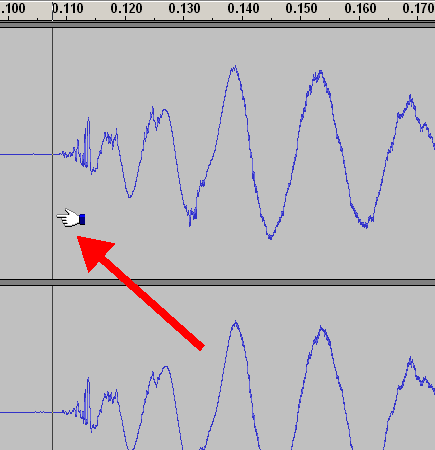
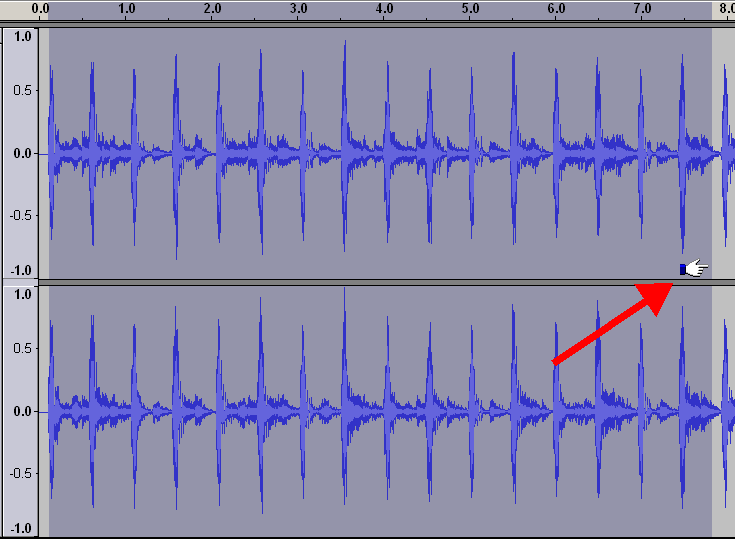
Waveform selection was described here - Audacity control toolbar using. After the selection was made the special Audacity "Hand cursor" could occur if you move mouse cursor to the right and the left border of the selection. These cursors allow to user to change the length of the waveform selection to any side.

Top
It is the Audacity "Hand cursor" to the left direction.

Top
To define start point of selection could be needed to Zoom in to desired scale, then click using mouse to the waveform point to view vertical Audacity cursor line, after that Hand cursor will be shown. Position of the vertical cursor line could be changed using another mouse click or simply using "Left" and "Right" key's pressing.
Top
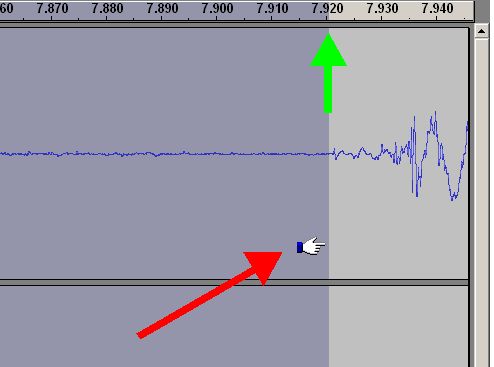
To define the End selection point, Zoom Out the waveform, and using mouse on "Hand cursor" "Shift+Left" and "Shift+Right" key combinations.
Top
Length of selection could be adjust with a high accuracy using Zoom In functions at a high scaling.
Top
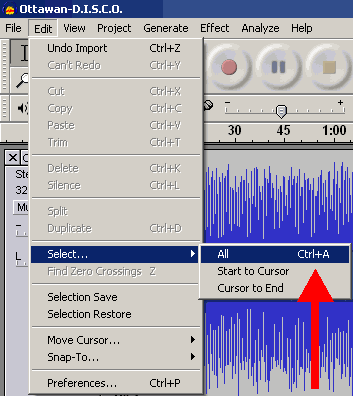
Users of the audio editing software work with tracks, editing them, in most cases, for whole track - for this purpose we need "Select all file" selection - could be selected from "Edit -> Select ..." menu or simply "CTRL+A" key combination.
Top
During audio editing user need to control playback - Audacity includes frequently used buttons from Audacity control toolbar. This button realize "Skip to Start" function and could be called by "Home" key also.

Top
Audacity "Play" button starts playback of the selection or the whole track if nothing is selected..

Top
For some purpose Audacity gives to user an opportunity for loop playing - just hold "Shift" key and press changed "Play" button.

Top
"Record" button's pressing will start recording from the input device you selected in Audacity preferences. The recording level will be active also.

Top
"Pause" button make a pause during playback and recording.

Top
"Stop" button makes playback and recording stopped.

Top
"Skip to end" button moves Audacity cursor to the end of the track. This function could be called by "End" key pressing.

Top
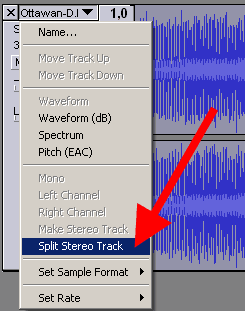
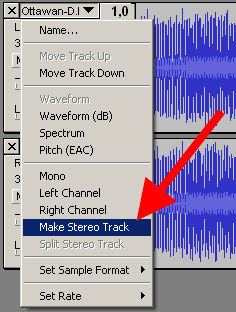
Each track in Audacity has own "Track menu" - red arrow.
Top
There are some differences for "Track menu" listing for stereo and mono tracks - this screenshot shows to you a variant for stereo track. Any active string from the "Track menu" could changed:
Name - defines the track's name
Waveform and waveform dB switch modes of displaying for track's waveform
Spectrum mode shows frequency spectrum instead of waveform, remember that the maximum frequency for waveform is the changing value in the preferences
Pitch (EAC) builds curve using Enhanced Autocorrelation Algorithm - for advanced users
Set Sample Format changes the format for this track only, not the global preferences
Set Rate changes the rate for this track only, not the global preferences

Top
To split stereo track use this option from the "Track menu"
Top
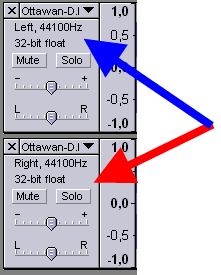
Audacity will split stereo track to a "Left" and "Right" tracks - it could be edited in an individual order and then mixed to the Stereo Track back.
Top
Just select "Make Stereo Track" to create stereo track from "Left" and "Right" channels after editing.
Top
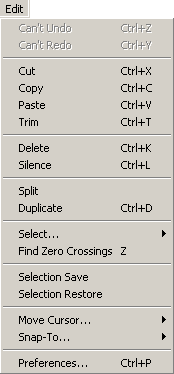
Now, take a look at "Edit" menu listing, which contains these options:
Undo - cancel the previous operation or operations to an initial if the user need it.
Redo - repeat the operation if it was cancelled by user - from the initial to the last
Cut - removes the selection from the track, copying this selection to the clipboard, it could be the whole track, "CTRL+X" key combination.
Copy - copying of the selection to the clipboard, "CTRL+C" key combination.
Paste - paste to the selected point, "CTRL+V" key combination
Trim - removes all waveform outside of the selection, "CTRL+T" key combination
Delete - simply removes selection, "CTRL+K" key combination
Silence - makes a silence during the selection, "CTRL+L" key combination
Split - makes the silence in the source track, and makes the new audio track in the same project with the waveform at the same time position
Duplicate - makes the new audio track in the same project with the waveform at the same time position, without the silence in the source track, "CTRL+D" key combination
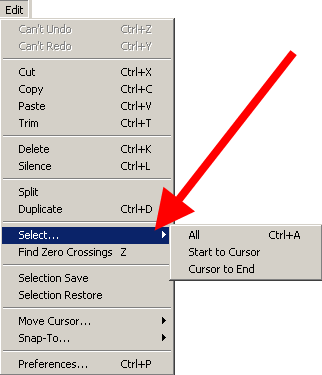
Select - defines the selection modes:
Select All - all waveform
Start To Cursor - from the initial waveform's position to cursor
Cursor To End - from the cursor position to the end of the waveform
Find Zero-Crossing - corrects left and right edges of the selection finding zero-level crossing of the waveform to prevent parasite sound clicking after copy and paste operations, "Z" key.
Selection Save - saves in the Audacity internal buffer the selection to restore it later
Selection Restore - restores the selection, if the "Selection Save" operation was made earlier
Move Cursor - defines these movements of the cursor:
To Track Start
To Track End
To Selection Start
To Selection End
If any waveform's selection was on the screen, it will be unselected
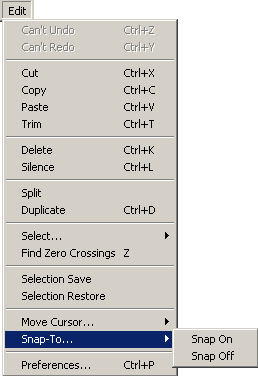
Snap-To defines snapping options:
Snap-On - enables snap
Snap-Off - disable snap
Preferences as described earlier
Top
Select submenu
Top Edit menu
Move Cursor submenu.

Top Edit menu
Snap-To submenu.
Top Edit menu
View menu listing contains these operations to make the audio editing with Audacity more easy, correct and comfortable:
Zoom In - increases the Zoom scaling, "CTRL+1" key combination
Zoom Normal - resets any Zoom scaling, showing on the screen 10-second's timeline, "CTRL+2" key combination
Zoom Out - decreases the Zoom scaling, "CTRL+3" key combination
Fit In Window - changes the Zoom scaling to place the whole track's waveform in one window, "CTRL+F" key combination
Fit Vertically - resizes the height of the waveform on the screen to maximum possible height, "CTRL+SHIFT+F" key combination
Zoom To Selection - changes the Zoom scaling so the selection will take a window's width, "CTRL+E" key combination
Selection Format - defines the selection mode for the audio editing
Float options allow to user to remove Audacity Toolbars
Top
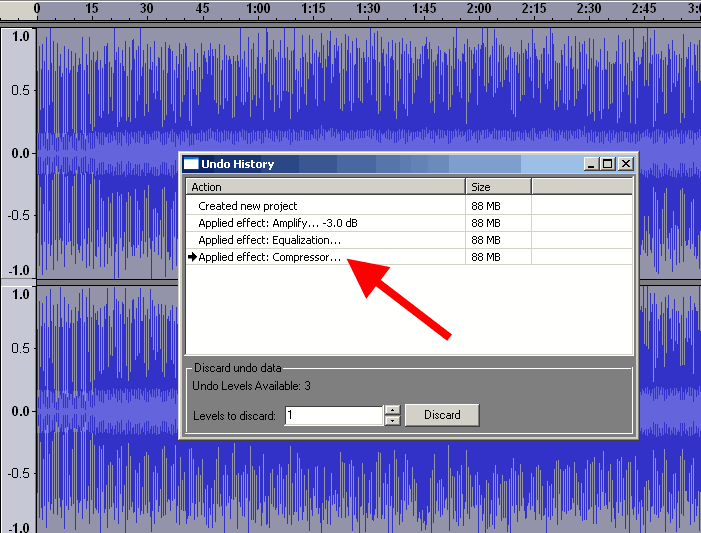
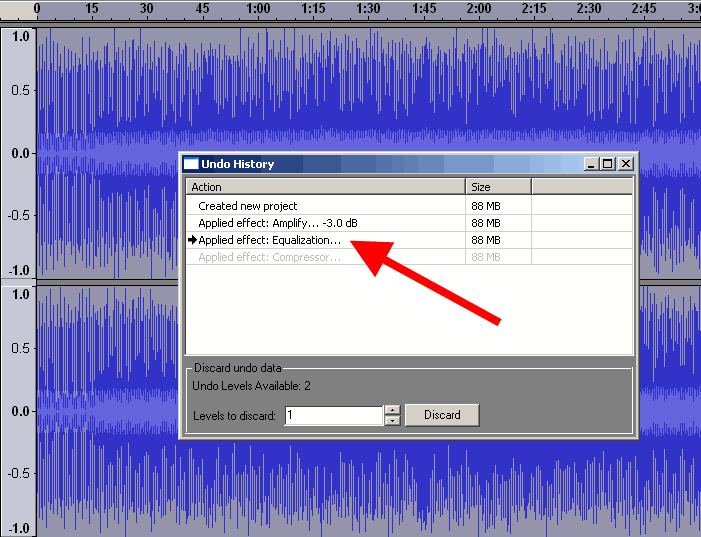
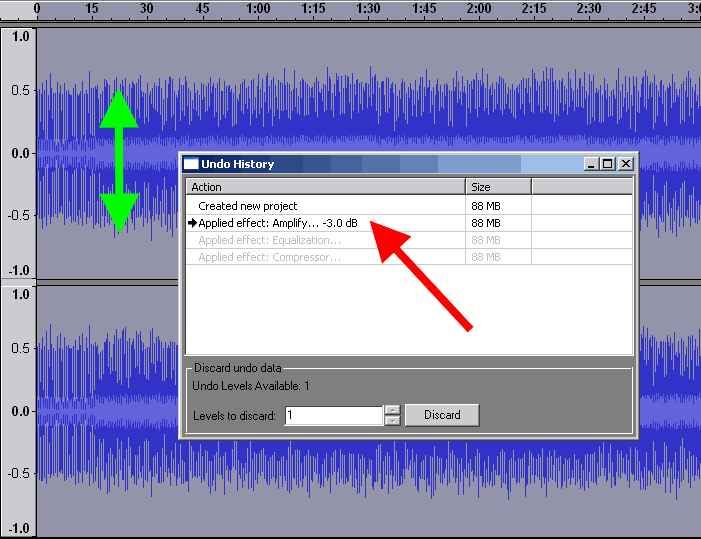
Audacity includes great History Undoing levels, so you can step-by-step into reverse direction, but jumping to any level of undoing. In our example we used 3 operations, so we can undo them at any level (red arrow). You can also select level to discard from the "Discard Undo Data" section in the "History" window. This is Level 1.
Top
Level 2 screenshot.
Top
Level 3 screenshot. Green double-sided arrow shows that the Amplify -3dB changed the waveform.
Top
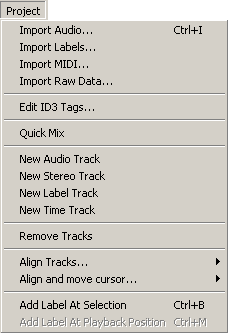
"Project" menu listing provides these operations with Audacity projects:
Import Audio - imports any supported audio file into Audacity Projects, "CTRL+I" key combination
Import Labels - imports labels from text file to place them into "Label track" in the project
Import MIDI - imports MIDI file to view it, not allowing to play, edit, save them
Import RAW Data - imports uncompressed data from the files, recognizing type of the data automatically, do not use this command with compressed audio formats
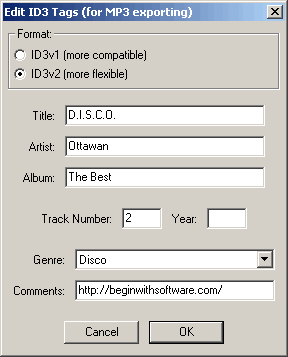
Edit ID3 Tags allows to user to define ID3 tags for MP3 exporting, ID3v1 or ID3v2 selection is possible
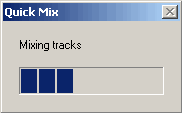
Quick mix allows to run mixing of all selected tracks - to select hold "Shift" key and click using mouse the tracks you need
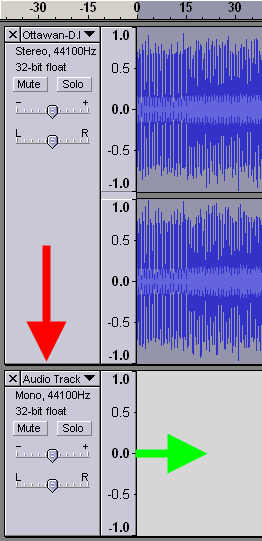
New Audio Track - adding a new blank mono audio track to the Audacity project with the same sample rate
New Stereo Track - adding a new blank stereo audio track to the Audacity project with the same sample rate
New Label Track - adding a new blank label track to the project at the bottom part of the window.
New Time Track - adding a new timeline track to the project at the top of the window.
Remove Tracks - removing of the selected tracks from the project, to select track hold "SHIFT" key and click the left information zones of it - selection is done, when the info zone's color change from gray to blue color
Align Tracks - moves the edges of the project to specified points. These points could be:
Align With Zero - moves the start edge to the zero timeline position
Align With Cursor - moves the start edge to the cursor position. Timeline will not be changed, so until this cursor point you will see the silence
Align With Selection Start - moves the start edge to the start of the selection, timeline will not be changed, selection will be the same
Align With Selection End - moves the start edge to the end of the selection, timeline will not be changed, selection will be viewable at the timeline only
Align End With Cursor - moves the start edge of the project, so the length of the track will be equal time range from zero to cursor position, and this part will be taken from the end of the track.
Align End With Selection Start - moves the start edge of the project, so the length of the track will be equal time range from zero to selection start position, and this part will be taken from the end of the track.
Align End With Selection End - moves the start edge of the project, so the length of the track will be equal time range from zero to selection end position, and this part will be taken from the end of the track.
Align and Move Cursor - repeats previously described operations with edges movements, including cursor moving. These operations:
Align With Zero
Align With Cursor
Align With Selection Start
Align With Selection End
Align End With Cursor
Align End With Selection Start
Align End With Selection End
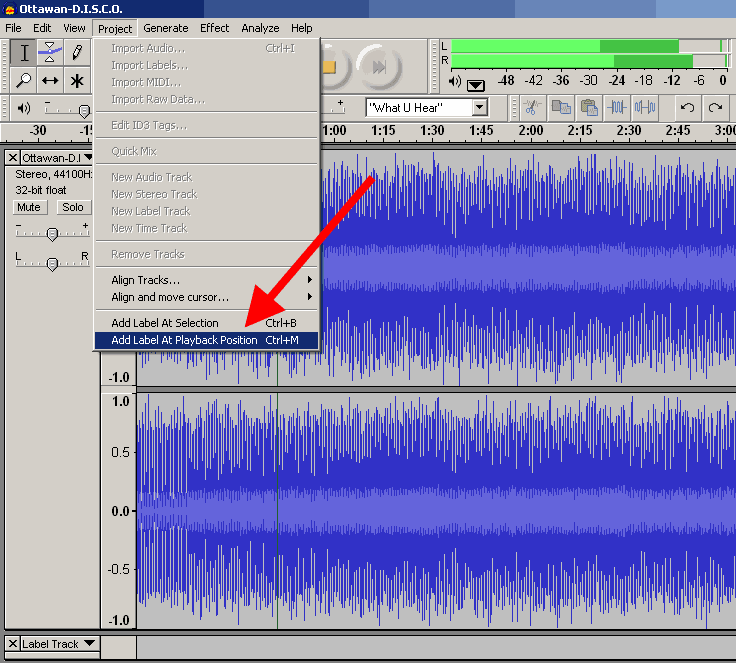
Add Label At Selection - adding a label at the start of the selection to the start position to a new label track - use "CTRL+B" key combination.
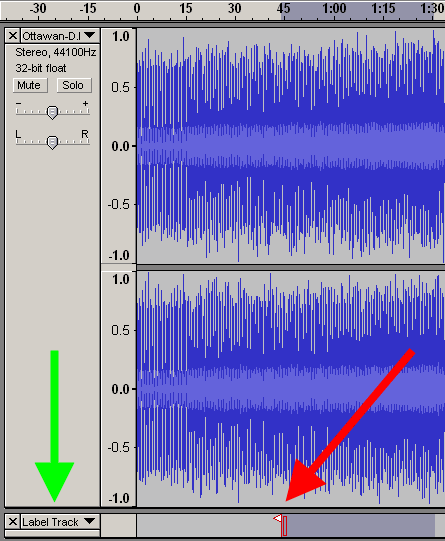
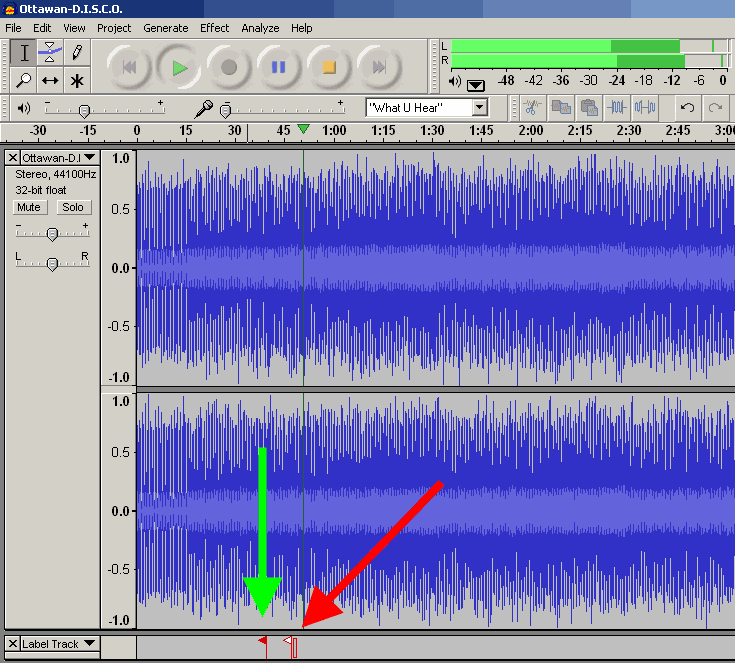
Add Label At Playback position - place a new label to the existing label track during playback in Audacity - press "CTRL+M" key combination to view new label, marked as white triange flag at the label track - red arrow. The previous labels are marked as red triangle flags - green arrow.
Top Project menu
Window for editing of ID3 Tags in Audacity.
Top Project menu
Quick mix operation in progress.
Top Project menu
Adding a new mono audio track to the project.
Top Project menu
Adding a new stereo track to the project.
Top Project menu
Adding a new label track to the project.
Top Project menu
Adding a new time track to the project.
Top Project menu
Align tracks submenu.
Top Project menu
Align and move cursor submenu.
Top Project menu
Adding a new label at start of the selection.
Top Project menu
Adding a new label at playback position.
Top Project menu
White and red flags as labels at playback position.
Top Project menu
"Generate" menu listing include some internal into Audacity tools to generate various types of sounds for projects. These tools are:
Silence - creates the silence in the selection with the same length - green arrow. View results of the Silence here. If you will change the length of the silence manually, the track's time length will be changed to the value equal difference between selection time and the user's silence time, so the resulting track time could be decreased on increased.
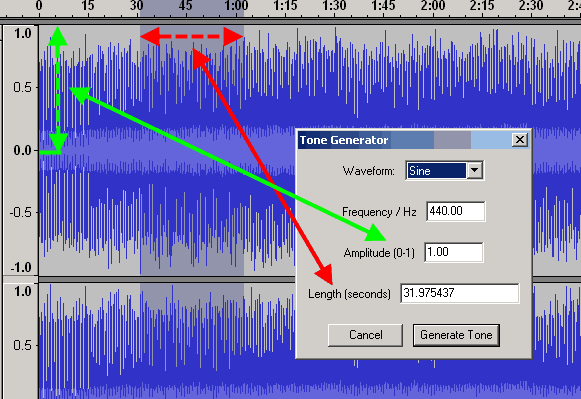
Tone Generator - generates the sine, square or sawtooth waveform instead of the selection with length of the selection (red dashed double-sided arrows), with amplitude equal as an user defined, from 0 to 1, (green dashed double-sided arrows).
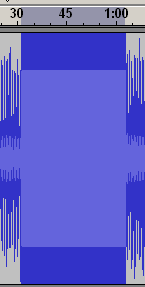
Tone Generator Results for our example is shown here, and Zoom In view of the generated sine wave. If the user entered the length value manually, the final track time could be increased or decreased as described in "Silence" generator.
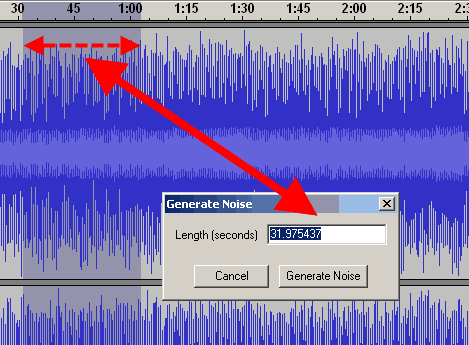
White Noise - generates the frequency summary spectrum sound, called as "White Noise" - sum of the low frequencies at the same time. Zoom In view of the white noise waveform is shown here. If the user entered the length manually, the track time will be changed as described in the "Silence generator".
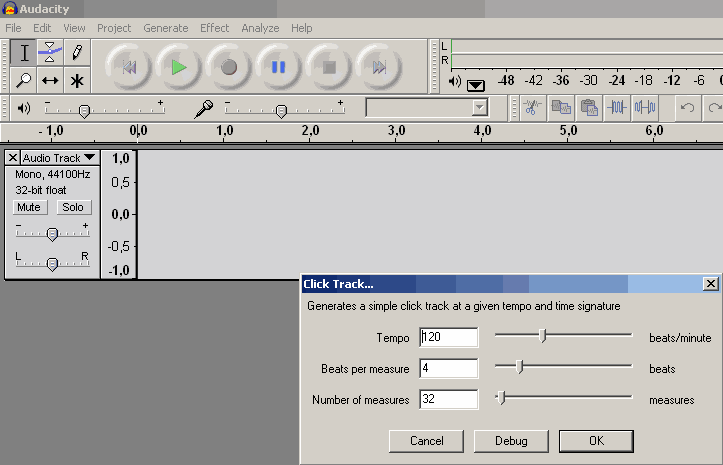
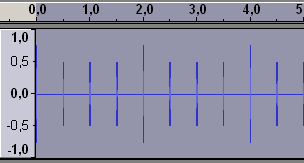
Click Track - generates the track with taps (clicks) with defined Tempo for Audacity projects, to synchronize the beats. For new track Click Track result is shown here
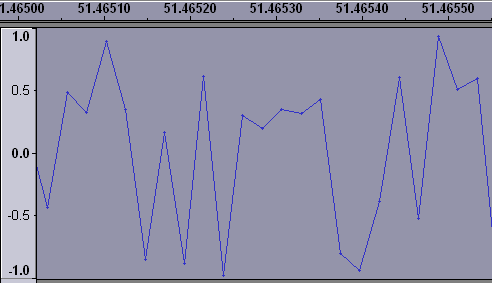
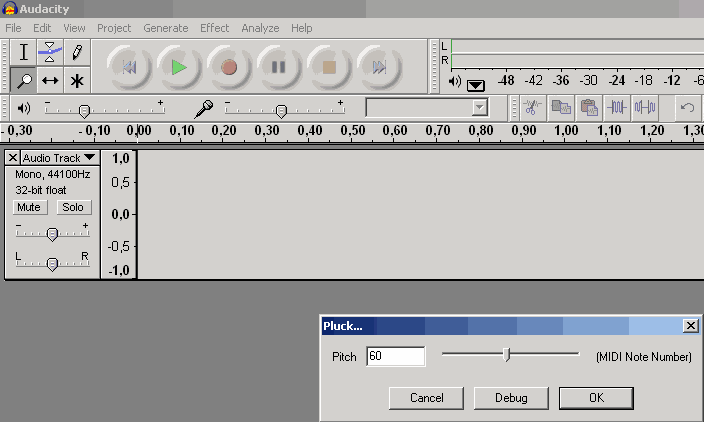
Pluck - generates a pluck as the user defined, sounds as a guitar, with 1 second length, if the cursor placed at the zero time position. Pluck result for 60 midi note number is shown as our example.
Top Generate menu
Generate Silence window.

Top Generate menu
Generate Silence resulting waveform.

Top Generate menu
Tone Generator window.
Top Generate menu
Tone Generator resulting waveform.
Top Generate menu
Zoom view of the sine wave for Tone Generator.

Top Generate menu
White Noise window.
Top Generate menu
White Noise resulting Waveform.
Top Generate menu
Generate Click Track for New Track.
Top Generate menu
Click Track for New Track Result.
Top Generate menu
Generate Pluck.
Top Generate menu
Pluck result for 60 Midi Note number.
Top Generate menu
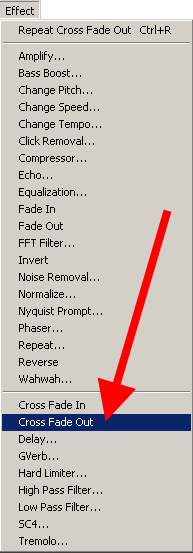
"Effect" menu provides the main features for audio editing using Audacity, including: Amplify, Bass Boost, Change Pitch, Change Speed, Change Tempo, Click and Pop Removal, Compressor, Echo, Equalization, Fade In, Fade Out, FFT filter, Invert, Noise removal, Normalize, Nyquist Prompt, Phaser, Repeat, Reverse, Wahwah, Cross Fade In, Cross Fade Out, Delay, GVerb, Hard Limiter, High Pass Filter, Low Pass Filter, SC4, Low Tremolo.
Top Effect menu
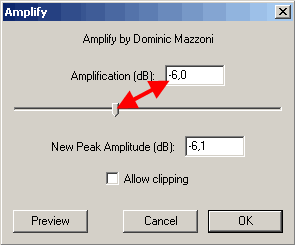
Amplify - provides amplifying of audio in dB scale - for new users, -6 dB will decrease the audio volume level at 50% (two times lower), positive values increase the volume. This operation could be useful for tracks mixing before it to prevent audio clipping. Audacity allows clipping (check this option, but it is not recommended).
Top Effect menu
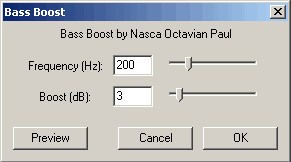
Bass boost - amplify the bass frequencies near the user defined (200 Hz as shown) and it's level in dB.
Top Effect menu
Change Pitch - provides pitch changing for the audio track, could be measured in Notes (Tabs), semitones, frequencies, percents, could be increased or decreased.

Top Effect menu
Change pitch Notes (Tabs) range.
Top Effect menu
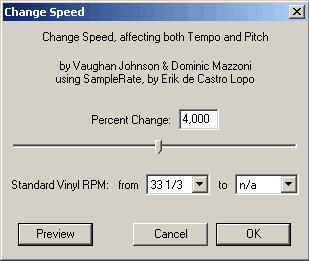
Change Speed - modifies the speed of the track, including the tempo and pitch, works as analog of real speed changing for the motor of the tape recorder, vinyl turntable, etc.
Top Effect menu
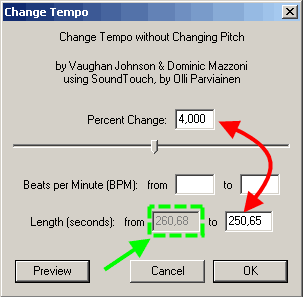
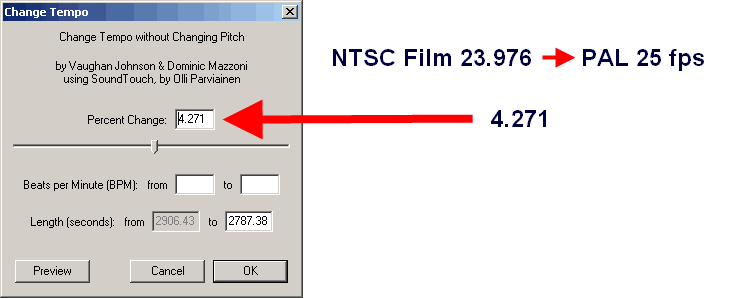
Change tempo - modifies the tempo of the audio track without changing the pitch - excellent digital effect audio track mixing, video editing, such as NTSC Film 23.976 FPS To PAL 25 FPS audio conversion, PAL 25 FPS To NTSC Film 23.976 FPS audio conversion. Could be measured in percents, Beats Per Minute (BPM).
Top Effect menu
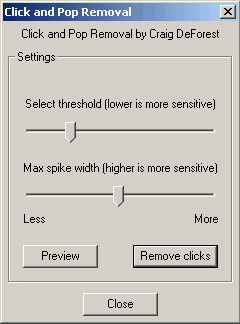
Click and Pop Removal - removes parasitic clicks from vinyl records, depending of the source quality, must be adjusted in a few turns, using "Preview" button with desired selection. Two faders in this effect - threshold and width.
Top Effect menu
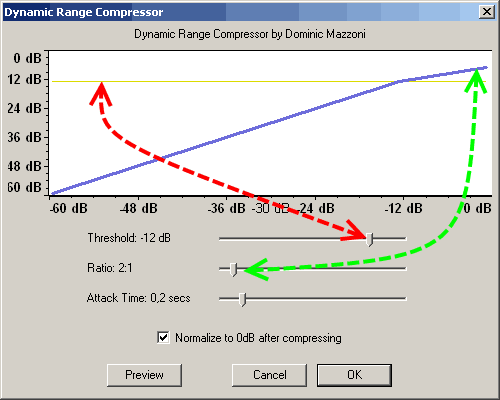
Dynamic range compressor - provides sound dynamic compressing such as real equipment with options: threshold (red double-sided dashed arrows), ratio from 1,5:1 to 10:1 (green double-sided dashed arrows), attack time from 0,1 second to 1 second. Previewing is enabled also.
Top Effect menu
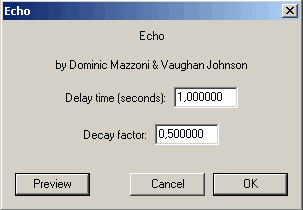
Echo - provides echo effect for audio, recommended for voice channels, adjusting delay time and decay factor - use preview to get desired results.
Top Effect menu
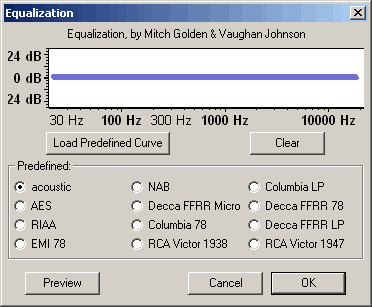
Equalization - provides frequency equalizer audio editing, adjusting the frequencies bands levels. This effect could be used with predefined curves and user defined curves - it will be shown at bottom screenshots.
Top Effect menu
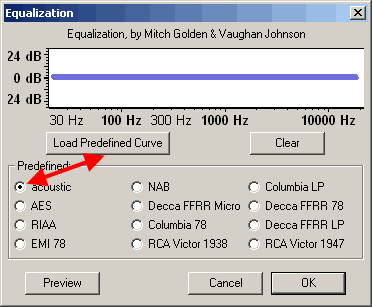
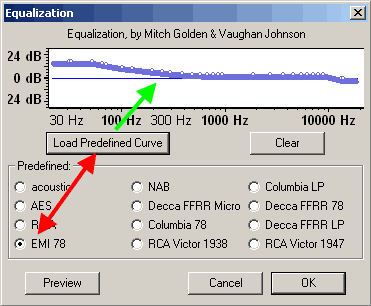
To load predefined curve just check the preset from the list, then press "Load Predefined Curve".
Top Effect menu
Our example shows how EMI 78 predefined curve was loaded - green arrow shows the changed equalization settings.
Top Effect menu
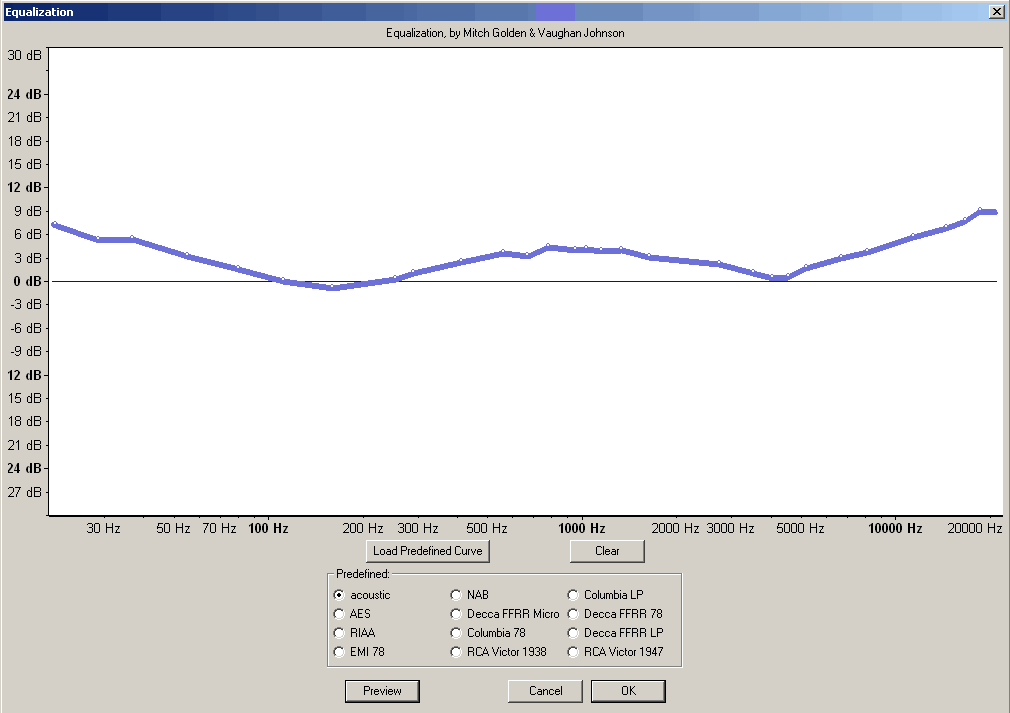
In most cases user edited curve is needed - to achieve the best result, firstly resize the equalization window to the maximum of the width and height. Then using a mouse place points at the frequencies you want to adjust and change the level of them. Using of "Preview" during this operation is very useful. After all changes will be done, press "OK" button to apply equalization. "Clear" button resets all levels to the 0 dB. Equalization effect uses logarithmic frequency scale, to work with linear frequency scale use FFT Effect
Top Effect menu
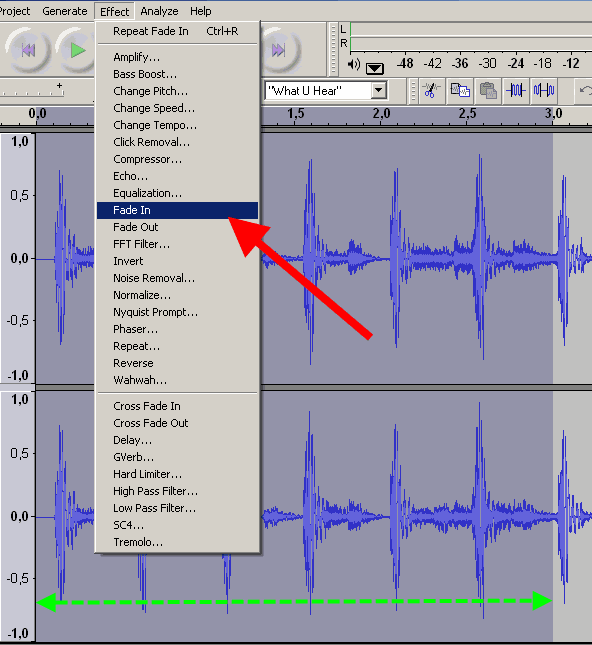
Fade In - operation, that simulates fader up movement digitally, increasing the level of the audio - it is recommended to select the desired time selection, a few seconds for example, and use this effect. The waveform range, marked with a green double-sided dashed arrows will be changed.
Top Effect menu
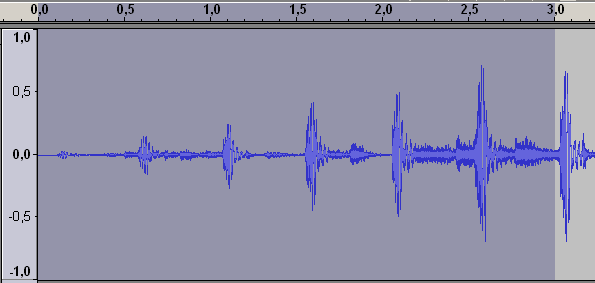
The resulting waveform for 3 seconds selection after Fade In effect is shown here.
Top Effect menu
Fade Out - this operation simulates fader down movement digitally, decreasing the level of the audio - it is recommended to select the last few seconds of audio track to use this filter - this selection is marked with a green double-sided dashed arrows.
Top Effect menu
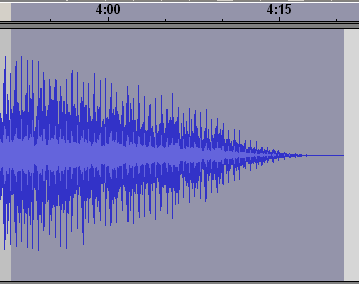
Resulting waveform for Fade Out effect is shown here.
Top Effect menu
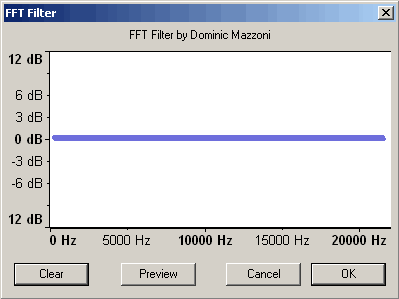
FFT filter - similar to the Equalization effect, but uses linear frequency scale. The default window is show here. User could work with this default window, but it is recommended to enlarge it size.
Top Effect menu
To make user edited curve, place points on the curve, and then change the dB level of the curve. Green arrow marks the frequency point, red arrow marks the dB level. "Clear" button resets all adjusted levels, use the "Preview" button to achieve the desired results. When the user's curve will be done, press "OK" to apply this effect.

Top Effect menu
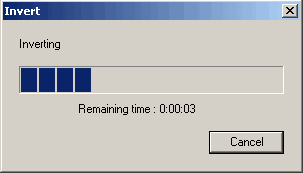
Invert - this operation inverts the phase of the audio, useful for using for stereo audio tracks to restore the right phases if it were rotated cause error analog cables plugging, etc.
Top Effect menu
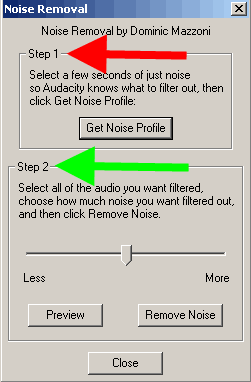
Noise removal - removes the noise from the audio. It is very aggressive effect, firstly define the audio selection with noise to define a kind of noise - red arrow. Then adjust the level of the noise removing - green arrow. Use "Preview" to control the depth of noise removing, need to obtain some experience to get good results.
Top Effect menu
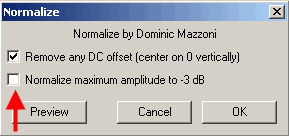
Normalize - this operation scans the audio selection (or whole track, if need), and amplifies the level of the audio that the maximum will be at 0 dB level. Audacity could adjust level to -3 dB level, if this option will be checked - red arrow, plus DC offset removing option. It is recommended to use Normalize effect for audio tracks recorded from Line inputs, Mic Inputs, etc.
Top Effect menu
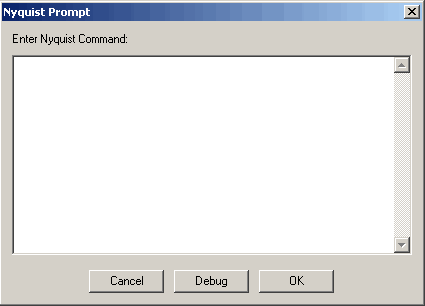
Nyquist Prompt - this effect for the advanced users only, to process the audio using non-usual Nyquist prompts.
Top Effect menu
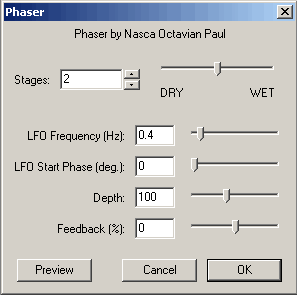
Phaser - this effect combines source signal with phase shifted clone of it.
Top Effect menu
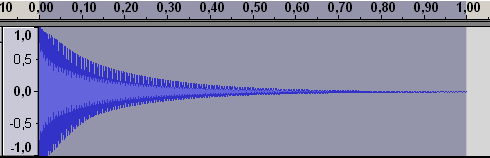
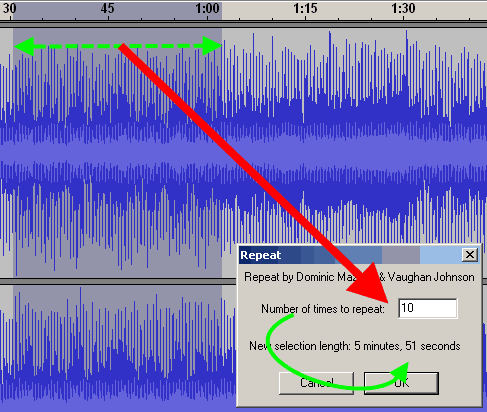
Repeat - repeats the audio selection the desired times and places it instead of old selection. Double-sided dashed green arrow shows the length of the old selection, red arrows marks the number of repeats, and the solid green arrow shows the new selection length.
Top Effect menu
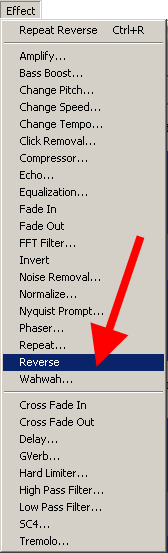
Reverse - this operation makes the selection placed in reverse direction.
Top Effect menu
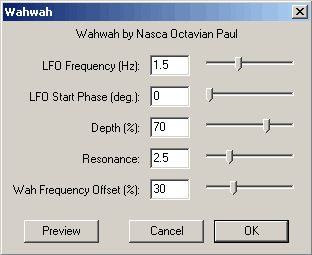
Wahwah - this effect combines the phase shifting and spectrum shifting in one - use "Preview" to adjust it.
Top Effect menu
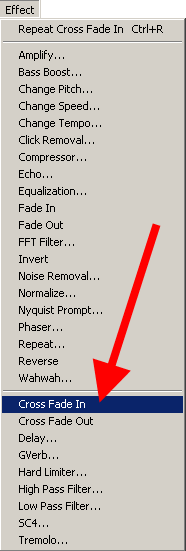
Cross Fade In - another version of the Fade In effect in Audacity.
Top Effect menu
Cross Fade Out - another version of the Fade Out effect in the Audacity.
Top Effect menu
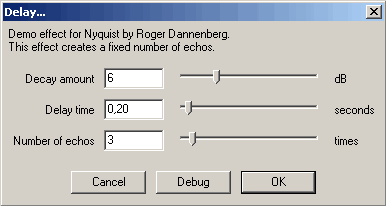
Delay - this effect creates a fixed number of echos, with adjusted level of echo in dB, delay time, and the number of echos - no "Preview" here, use this effect and Undo (CTRL+Z) to find the desired quality, This effect in most cases use for vocal audio tracks, etc.
Top Effect menu
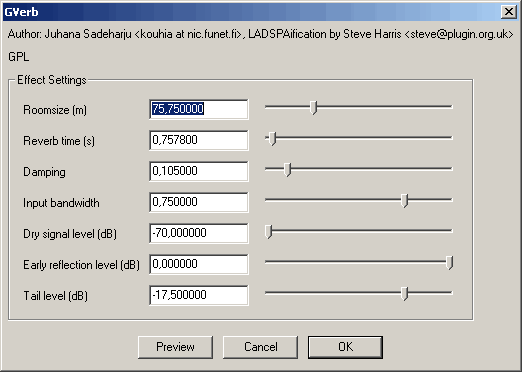
GVerb - this effect creates a sound as broken with mixed echos or something similar, recommended for advanced users.
Top Effect menu
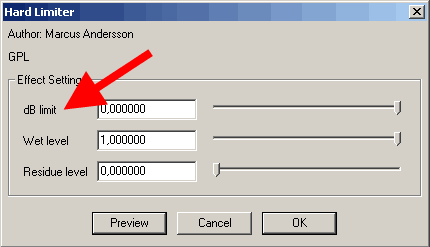
Hard limiter - limits the audio using dB scale (red arrow), with wet level option, must not be equal to zero. It is not recommended to use dB limit lower than -6dB for normalized signals, cause the hard limiting will destroy the audio - "Preview" mode will show it.
Top Effect menu
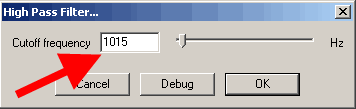
High Pass Filter - this filter will pass all frequencies higher than "Cutoff frequency".
Top Effect menu
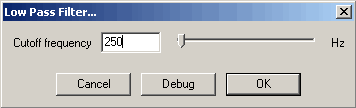
Low Pass Filter - this filter will pass all frequencies lower than "Cutoff frequency".
Top Effect menu
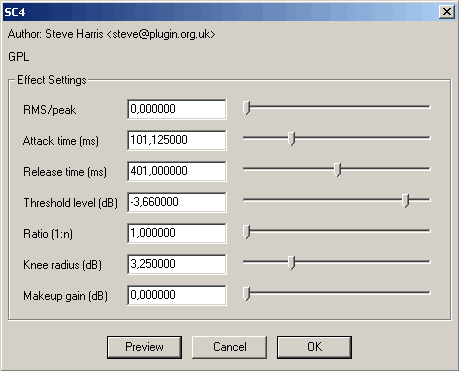
SC4 - similar to the real SC4 digital effect, providing soft sound dynamic compressing features.
Top Effect menu
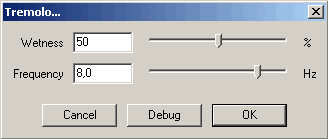
Tremolo - this effect creates a sound with vibrating feature.
Top Effect menu
"Analyze" menu includes tools for audio analyze, such as: Spectrum analyze, Beat finder, Silence finder.
Top Analyze menu
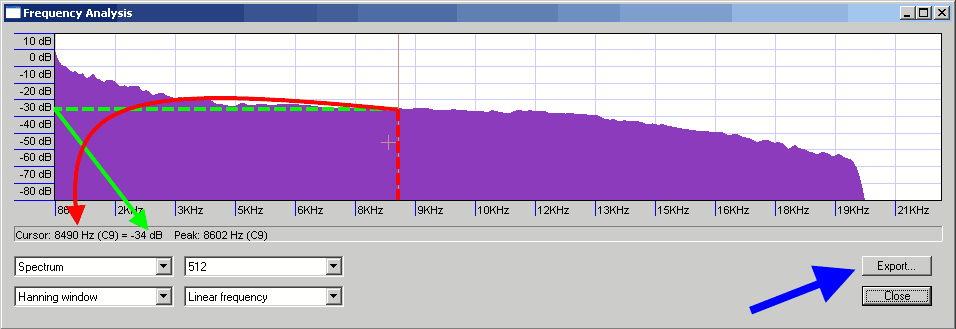
Spectrum analyze will help to user to define the frequency spectrum of their audio tracks, useful to limit or expand exporting bitrate for Audacity projects and other purposes, such as define the frequency limitations for microphones, analog tape recorders, etc. Use cross-type cursor to select the frequency (red arrow) to define it level in dB (green arrow). Spectrum analyze results could be exported to a text file using "Export" button.
Top Analyze menu
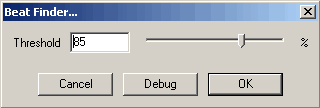
Beat finder will find beats corresponding to the defined level in percents.
Top Analyze menu
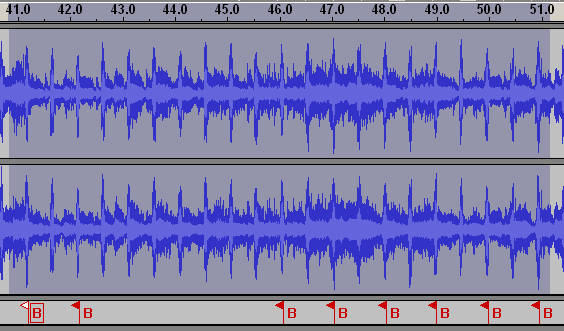
Beat time points will be marked in a "Label track" with "B" flags.
Top Analyze menu
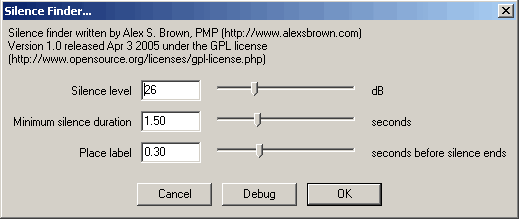
Silence finder will find the silence time points, corresponding to the defined "Silence level", "Minimum silence duration". User could define the placement of found silence time points (before silence ends).
Top Analyze menu
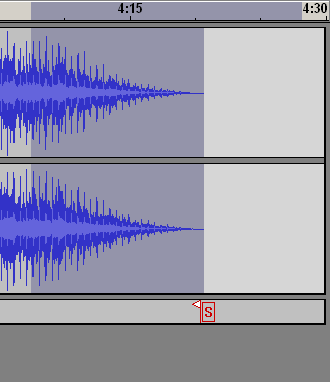
Silence time points will be marked in a "Label track" with "S" flags.
Top Analyze menu
"File" menu will need to use before or after all editing of the audio files. It includes options:
New - creates new Audacity window for the new project, "CTRL+N" key combination.
Open - opening of the audio file for editing in Audacity, "CTRL+O" key combination.
Close - closes audio file in Audacity, "CTRL+W" key combination.
Save Project - saves an Audacity project to the *.aup files plus some additional folders, "CTRL+S" key combination.
Save Project As - saves an Audacity project to a new *.aup files plus some additional folders.
Recent Files - shows sub listing with recent projects and audio files listing.
Export as WAV - exports the Audacity project to WAV file, so here is the final step after opening or importing for MP3 to WAV, MPA to WAV, MP2 to WAV, M2A to WAV, AIFF to WAV, OGG to WAV, AU to WAV conversion.
Export Selection as WAV - the same as above for selection.
Export as MP3 - exports the Audacity project to MP3 file, so here is the final step after opening or importing for WAV to MP3, MP2 to MP3, MPA to MP3, M2A to MP3, AIFF to MP3, OGG to MP3, AU to MP3.
Export Selection as MP3 - the same as above for selection.
Export as OGG Vorbis - exports the Audacity project to OGG file, so here is the final step after opening or importing for WAV to OGG, MP2 to OGG, MPA to OGG, MP3 to OGG, M2A to OGG, AIFF to OGG, AU to OGG.
Export Selection as OGG - the same as above for selection.
Export Labels - exports label tracks to TXT file with time points and labels names in it.
Export Multiple - exports audio tracks and label track in one tool, just select the format for exporting (WAV, MP3, OGG), export location.
Page Setup - setup for printing
Print - prints the Audacity project.
Exit - terminates the program.
Top
NTSC Film 23.976 FPS To PAL 25 FPS audio conversion.
Audacity could change the tempo (i.e. speed) of audio, so, for PAL speed is 25 frames per second, For NTSC Film is the 23,976 frames per second. Let variable p=25, n=23,976 for our calculations.
Out equation is
n+n*dx=p
dx - non dimensional coefficient
n*(1+dx)=p
1+dx=p/n
dx=(p/n)-1 ds=dx*100%=((25/23,976)-1)*100%=4,271%
Use this value for NTSC Film 23.976 FPS To PAL 25 FPS audio conversion with "Change Tempo" effect.
Top
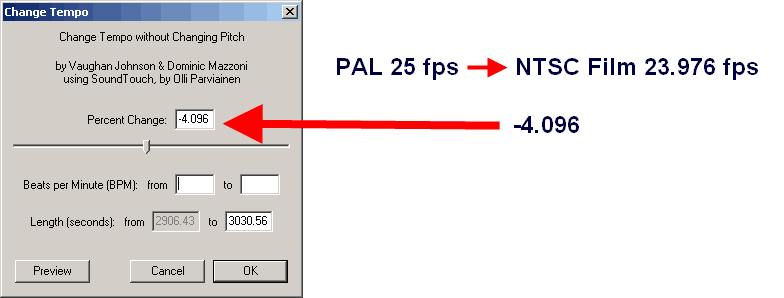
PAL 25 FPS To NTSC Film 23.976 FPS audio conversion.
Let variable p=25, n=23,976 for our calculations.
Our equation is
p+p*dx=n ,
where dx - non-dimensional coefficient.
p*(1+dx)=n
1+dx=n/p
dx=(n/p)-1
dx=(23,976/25)-1
ds=dx*100%=-4,096%
Use this value for PAL 25 FPS To NTSC Film 23.976 FPS audio conversion with "Change Tempo" effect.
Top
Author of this tutorial hopes that presented information helped to learn basic Audacity features for audio editing.
See more video guides at Videohelp.com and Doom9.org
To contact to the author of this guide, please send e-mail:
Aleksandr Ignatov